如何用 Python 构建 AI 视频课程生成器
借助 LLM、文字转语音和 FFmpeg,将 PowerPoint 幻灯片全自动转换为带旁白的视频课程。

录制一门高质量的视频课程是件苦差事。你需要一个安静的房间、无懈可击的表达,以及每次说错一句话就重录的耐心。把这些乘以横跨十几门课程的上百张幻灯片,你就遇到了一个实实在在的效率难题。
如果只要上传一份 PowerPoint 演示文稿,就能拿回一段配好旁白的完整视频,会怎样?这正是本文要构建的东西:一个 AI 驱动的视频课程生成器,它接收一个 PPT 文件,产出可直接发布的 MP4——完全不需要麦克风。
整条流水线分为五个阶段:从幻灯片中提取文本和图片,用 LLM 生成旁白脚本,用 TTS 引擎合成语音,最后用 FFmpeg 合成成品视频。
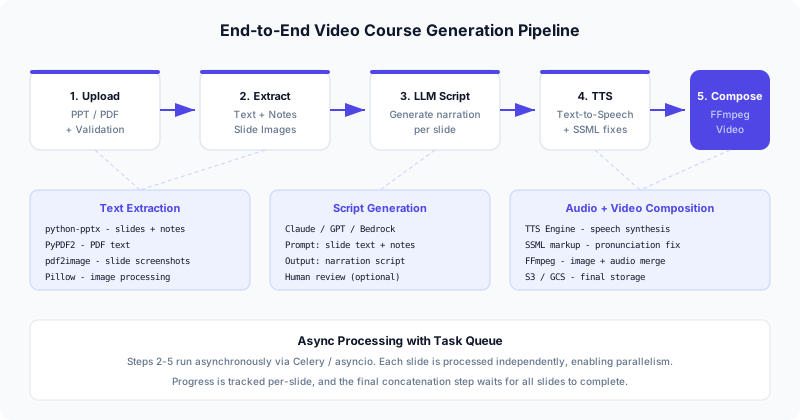
架构概览
这套系统刻意做到了与云厂商无关。你既可以完全在单台机器上运行,也可以把它分布到各种云服务上:
| 组件 | 本地方案 | 云端方案 |
|---|---|---|
| 文件存储 | 本地文件系统 | S3、GCS、Azure Blob |
| 文本提取 | python-pptx、PyPDF2 | 同上(跑在你的后端里) |
| LLM 脚本生成 | Ollama、llama.cpp | Bedrock(Claude)、OpenAI、Azure OpenAI |
| TTS 语音合成 | CosyVoice、ChatTTS | AWS Polly、Azure TTS、Google TTS |
| 视频合成 | FFmpeg | 同上(跑在你的后端里) |
| 任务队列 | 进程内 asyncio | Celery + Redis、SQS |
后端是一个 FastAPI 应用。每个课程生成任务都异步处理——用户上传 PPT,拿回一个任务 ID,然后轮询进度。在内部,每张幻灯片都独立处理,因此你可以在所有幻灯片之间并行执行 TTS 和图片渲染。
POST /api/courses/{course_id}/generate
  → Validate PPT file
  → Create async job
  → Return job_id

GET /api/jobs/{job_id}
  → Return { status, progress, video_url }
第一步——从 PPT 中提取文本和图片
第一个挑战是从 PowerPoint 文件中抽取结构化内容。每张幻灯片我们需要两样东西:文本内容(标题、正文和演讲者备注),以及把幻灯片渲染成 PNG 的截图。
数据模型
from dataclasses import dataclass
from typing import Optional

@dataclass
class SlideContent:
    """Extracted content from a single slide."""
    index: int
    text: str
    notes: str
    image_path: Optional[str] = None
安全的文件处理
最初的实现存在一个 SSRF 漏洞——它用 requests.get() 从任意 URL 拉取 PPT 文件,且不做任何校验。任何人都可以把它指向某个内部服务(http://169.254.169.254/latest/meta-data/),进而窃取云凭证。
下面是一个经过加固的版本,它在本地校验上传内容:
import io
import tempfile
import os
from pathlib import Path
from typing import List

from pptx import Presentation
from pdf2image import convert_from_path
from fastapi import UploadFile, HTTPException

# Maximum file size: 100 MB
MAX_FILE_SIZE = 100 * 1024 * 1024
ALLOWED_EXTENSIONS = {".pptx", ".ppt", ".pdf"}


def validate_upload(file: UploadFile) -> bytes:
    """Validate uploaded file before processing."""
    # Check extension
    ext = Path(file.filename).suffix.lower()
    if ext not in ALLOWED_EXTENSIONS:
        raise HTTPException(
            status_code=400,
            detail=f"Unsupported file type: {ext}. Allowed: {ALLOWED_EXTENSIONS}",
        )

    # Read with size limit
    content = file.file.read()
    if len(content) > MAX_FILE_SIZE:
        raise HTTPException(
            status_code=400,
            detail=f"File too large. Maximum size: {MAX_FILE_SIZE // (1024*1024)} MB",
        )

    return content


def extract_slides_from_pptx(content: bytes) -> List[SlideContent]:
    """Extract text, notes, and images from a PPTX file.

    Returns a list of SlideContent, one per slide.
    """
    file_obj = io.BytesIO(content)
    presentation = Presentation(file_obj)

    slides: List[SlideContent] = []
    for idx, slide in enumerate(presentation.slides):
        # Collect all text from shapes
        text_parts = []
        for shape in slide.shapes:
            if hasattr(shape, "text") and shape.text.strip():
                text_parts.append(shape.text.strip())
        slide_text = "\n".join(text_parts)

        # Extract speaker notes
        notes_text = ""
        if slide.has_notes_slide:
            notes_slide = slide.notes_slide
            notes_text = notes_slide.notes_text_frame.text.strip()

        slides.append(SlideContent(
            index=idx,
            text=slide_text,
            notes=notes_text,
        ))

    return slides
将幻灯片转换为图片
PowerPoint 文件无法在 Python 中原生渲染,因此我们先(用无头模式的 LibreOffice)转成 PDF,再把每一页栅格化为图片:
import subprocess

def pptx_to_images(content: bytes, output_dir: str, dpi: int = 200) -> List[str]:
    """Convert PPTX to PNG images via LibreOffice + pdf2image.

    Returns a list of image file paths, one per slide.
    """
    with tempfile.NamedTemporaryFile(suffix=".pptx", delete=False) as tmp:
        tmp.write(content)
        tmp_path = tmp.name

    try:
        # Convert PPTX → PDF using LibreOffice
        subprocess.run(
            [
                "libreoffice", "--headless", "--convert-to", "pdf",
                "--outdir", output_dir, tmp_path,
            ],
            check=True,
            timeout=120,
            capture_output=True,
        )

        pdf_path = os.path.join(
            output_dir,
            Path(tmp_path).stem + ".pdf",
        )

        # Convert PDF → PNG images
        images = convert_from_path(pdf_path, dpi=dpi)
        image_paths = []
        for idx, image in enumerate(images):
            image_path = os.path.join(output_dir, f"slide_{idx:03d}.png")
            image.save(image_path, "PNG")
            image_paths.append(image_path)

        return image_paths
    finally:
        os.unlink(tmp_path)
相比原方案的关键改进: 我们绝不从用户提供的 URL 拉取文件。文件通过 FastAPI 的 UploadFile 直接上传,对类型和大小做校验,并在一个用完即清理的临时目录中处理。
第二步——用 LLM 生成旁白脚本
幻灯片上的原始文本并不是好的旁白脚本。一张幻灯片上可能写着 “Q3 Revenue: $4.2M (+18% YoY)“——但旁白应该念成类似 “第三季度我们的营收达到了 420 万美元,同比增长 18%” 这样的话。
我们用 LLM 把幻灯片内容转化为自然的口语表达。
import json
from typing import List

import boto3

bedrock = boto3.client("bedrock-runtime", region_name="us-east-1")

SCRIPT_PROMPT = """You are a professional course narrator. Given the slide content
and speaker notes below, write a natural narration script for this slide.

Rules:
- Write in a conversational teaching tone, as if lecturing to students
- Expand abbreviations and acronyms on first use
- Spell out numbers in a speakable way (e.g., "$4.2M" → "4.2 million dollars")
- Keep the script between 30-120 seconds when read aloud (~75-300 words)
- Do NOT include stage directions or markup — just the spoken text
- If speaker notes are provided, use them as the primary guide for content

Slide text:
{slide_text}

Speaker notes:
{notes}

Narration script:"""


async def generate_script_for_slide(
    slide: SlideContent,
    model_id: str = "us.anthropic.claude-sonnet-4-6-v1",
) -> str:
    """Generate a narration script for a single slide using Bedrock."""
    prompt = SCRIPT_PROMPT.format(
        slide_text=slide.text or "(no text on this slide)",
        notes=slide.notes or "(no speaker notes)",
    )

    response = bedrock.invoke_model(
        modelId=model_id,
        body=json.dumps({
            "anthropic_version": "bedrock-2023-05-31",
            "max_tokens": 1024,
            "messages": [{"role": "user", "content": prompt}],
        }),
    )

    result = json.loads(response["body"].read())
    return result["content"][0]["text"].strip()


async def generate_all_scripts(
    slides: List[SlideContent],
    model_id: str = "us.anthropic.claude-sonnet-4-6-v1",
) -> List[str]:
    """Generate narration scripts for all slides.

    Processes sequentially to respect API rate limits.
    For higher throughput, use asyncio.gather with a semaphore.
    """
    import asyncio

    semaphore = asyncio.Semaphore(5)  # Max 5 concurrent requests

    async def generate_with_limit(slide: SlideContent) -> str:
        async with semaphore:
            return await generate_script_for_slide(slide, model_id)

    scripts = await asyncio.gather(
        *[generate_with_limit(s) for s in slides]
    )
    return list(scripts)
提示词工程技巧
旁白脚本的质量很大程度上取决于提示词。下面这些模式效果不错:
- 把演讲者备注作为首要上下文。 如果讲师写了备注,那里面才是真正的教学内容。幻灯片正文通常只是一堆要点。
- 设定明确的长度目标。 没有约束的话,LLM 往往要么生成得太少(只是把要点换个说法),要么太多(给一张简单的标题页配上 5 分钟独白)。
- 要求输出可朗读的内容。 提醒模型把 “$4.2M” 念成 “4.2 million dollars”,把 “YoY” 念成 “year over year”。
- 提供课程上下文。 对于多张幻灯片的课程,把整体课程标题和前面幻灯片的摘要一并传入,好让 LLM 保持叙事上的连贯性。
第三步——文字转语音合成
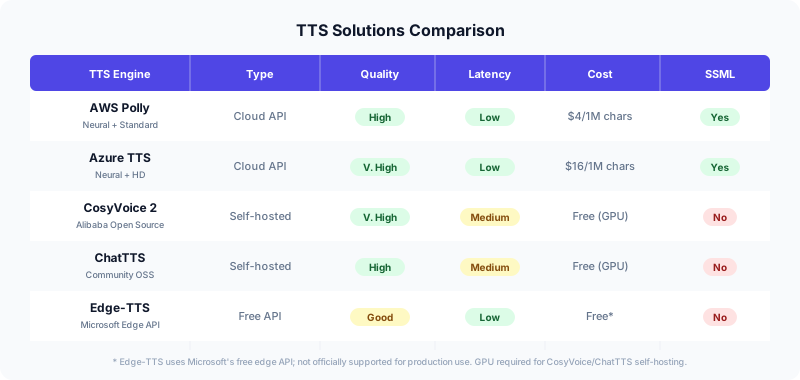
这里开始变得有意思了。你需要一个 TTS 引擎,它要听起来自然、能处理技术术语,并且大规模使用时不会贵得离谱。
方案 A:AWS Polly(云端,生产就绪)
AWS Polly 是最容易上手的。它支持用 SSML 精细调节发音,其神经网络语音听起来相当自然,价格为每百万字符 4 美元。
import boto3

polly = boto3.client("polly", region_name="us-east-1")


def synthesize_speech_polly(
    text: str,
    output_path: str,
    voice_id: str = "Matthew",
    engine: str = "neural",
) -> str:
    """Synthesize speech using AWS Polly.

    Returns the path to the output MP3 file.
    """
    response = polly.synthesize_speech(
        Text=text,
        OutputFormat="mp3",
        VoiceId=voice_id,
        Engine=engine,
    )

    with open(output_path, "wb") as f:
        f.write(response["AudioStream"].read())

    return output_path
方案 B:Edge-TTS(免费,质量不错)
Edge-TTS 是一个 Python 包,它调用微软 Edge 浏览器免费的 TTS API。作为免费方案它出人意料地好,尽管它并未获得官方的生产环境使用支持。
import asyncio
import edge_tts


async def synthesize_speech_edge(
    text: str,
    output_path: str,
    voice: str = "en-US-GuyNeural",
) -> str:
    """Synthesize speech using Edge-TTS (free)."""
    communicate = edge_tts.Communicate(text, voice)
    await communicate.save(output_path)
    return output_path
方案 C:CosyVoice 2(自托管,开源)
阿里巴巴的 CosyVoice 2 是目前最出色的开源 TTS 模型。它支持声音克隆、情感控制,能生成极其接近真人的语音。代价是你需要一块 GPU 来运行它。
# Requires: pip install cosyvoice
from cosyvoice.cli.cosyvoice import CosyVoice
from cosyvoice.utils.file_utils import load_wav
import torchaudio


def synthesize_speech_cosyvoice(
    text: str,
    output_path: str,
    model_dir: str = "pretrained_models/CosyVoice2-0.5B",
    speaker: str = "English Male",
) -> str:
    """Synthesize speech using CosyVoice 2 (self-hosted).

    Requires a GPU with at least 4 GB VRAM.
    """
    model = CosyVoice(model_dir)

    # Use built-in speaker
    output = model.inference_sft(text, speaker)

    # Save to file
    torchaudio.save(output_path, output["tts_speech"], 22050)
    return output_path
用 SSML 修正发音
技术内容里满是缩写和领域专有词汇,TTS 引擎经常读错。SSML(语音合成标记语言)可以让你修正这些问题。
一些需要修正的常见模式:
<!-- Acronyms: spell out letter by letter -->
<speak>
  Deploy your app to
  <say-as interpret-as="characters">ECS</say-as>
  using
  <say-as interpret-as="characters">CDK</say-as>.
</speak>

<!-- Version numbers -->
<speak>
  Python <say-as interpret-as="characters">3.12</say-as>
  introduced several new features.
</speak>

<!-- Custom pronunciation for brand names -->
<speak>
  <phoneme alphabet="ipa" ph="kuːbərˈnɛtiːz">Kubernetes</phoneme>
  orchestrates your containers.
</speak>

<!-- Pauses for readability -->
<speak>
  First, we extract the text.
  <break time="500ms"/>
  Then, we generate the narration script.
</speak>在实践中,你会想要一个发音字典——把词汇映射到它们经过 SSML 修正的版本。在把文本送入任何 TTS 引擎之前,把它作为一个预处理步骤应用:
import re
from typing import Dict

# Pronunciation corrections: plain text → SSML replacement
PRONUNCIATION_FIXES: Dict[str, str] = {
    "ECS": '<say-as interpret-as="characters">ECS</say-as>',
    "CDK": '<say-as interpret-as="characters">CDK</say-as>',
    "S3": '<say-as interpret-as="characters">S3</say-as>',
    "API": '<say-as interpret-as="characters">API</say-as>',
    "SDK": '<say-as interpret-as="characters">SDK</say-as>',
    "GPU": '<say-as interpret-as="characters">GPU</say-as>',
    "Kubernetes": '<phoneme alphabet="ipa" ph="kuːbərˈnɛtiːz">Kubernetes</phoneme>',
    "nginx": '<phoneme alphabet="ipa" ph="ɛndʒɪnˈɛks">nginx</phoneme>',
}


def apply_pronunciation_fixes(text: str, fixes: Dict[str, str] = None) -> str:
    """Wrap text in SSML and apply pronunciation corrections.

    Only applies to TTS engines that support SSML (Polly, Azure).
    """
    if fixes is None:
        fixes = PRONUNCIATION_FIXES

    for term, replacement in fixes.items():
        # Word-boundary matching to avoid partial replacements
        text = re.sub(
            rf"\b{re.escape(term)}\b",
            replacement,
            text,
        )

    return f"<speak>{text}</speak>"
第四步——用 FFmpeg 合成视频
这一环正是原文当成黑盒(“用某个云视频服务”)一笔带过的部分。实际上,FFmpeg 把这件事处理得非常漂亮,而且哪里都能跑。
核心思路是:对每张幻灯片,我们有一张 PNG 图片和一个 MP3 音频文件。我们需要创建一段视频片段,让图片精确显示音频那么长的时间,然后把所有片段拼接成一个 MP4。
合成单张幻灯片
import subprocess
import json


def get_audio_duration(audio_path: str) -> float:
    """Get the duration of an audio file in seconds using ffprobe."""
    result = subprocess.run(
        [
            "ffprobe", "-v", "quiet",
            "-print_format", "json",
            "-show_format",
            audio_path,
        ],
        capture_output=True,
        text=True,
        check=True,
    )
    info = json.loads(result.stdout)
    return float(info["format"]["duration"])


def compose_slide_video(
    image_path: str,
    audio_path: str,
    output_path: str,
    resolution: str = "1920x1080",
) -> str:
    """Create a video segment from a slide image and narration audio.

    The video shows the slide image for the exact duration of the audio.
    """
    duration = get_audio_duration(audio_path)

    subprocess.run(
        [
            "ffmpeg", "-y",
            # Input: loop the image for the audio duration
            "-loop", "1",
            "-i", image_path,
            # Input: the narration audio
            "-i", audio_path,
            # Video settings
            "-c:v", "libx264",
            "-tune", "stillimage",
            "-pix_fmt", "yuv420p",
            "-vf", f"scale={resolution}:force_original_aspect_ratio=decrease,"
                   f"pad={resolution}:(ow-iw)/2:(oh-ih)/2:black",
            # Audio settings
            "-c:a", "aac",
            "-b:a", "192k",
            # Duration: match audio length
            "-t", str(duration),
            "-shortest",
            output_path,
        ],
        check=True,
        capture_output=True,
        timeout=300,
    )

    return output_path
把所有幻灯片拼接成最终视频
def concatenate_videos(
    video_paths: List[str],
    output_path: str,
) -> str:
    """Concatenate multiple video segments into a single MP4.

    Uses FFmpeg's concat demuxer for lossless concatenation
    (all segments must have the same codec and resolution).
    """
    # Write the concat list file
    list_path = output_path + ".txt"
    with open(list_path, "w") as f:
        for path in video_paths:
            # FFmpeg concat requires escaped single quotes in paths
            safe_path = path.replace("'", "'\\''")
            f.write(f"file '{safe_path}'\n")

    try:
        subprocess.run(
            [
                "ffmpeg", "-y",
                "-f", "concat",
                "-safe", "0",
                "-i", list_path,
                "-c", "copy",
                output_path,
            ],
            check=True,
            capture_output=True,
            timeout=600,
        )
        return output_path
    finally:
        os.unlink(list_path)
完整流水线
把所有环节串成一条异步流水线:
import asyncio
import tempfile
import os
from typing import Optional, Callable


async def generate_course_video(
    pptx_content: bytes,
    output_path: str,
    tts_engine: str = "polly",
    model_id: str = "us.anthropic.claude-sonnet-4-6-v1",
    voice_id: str = "Matthew",
    on_progress: Optional[Callable[[int, int, str], None]] = None,
) -> str:
    """Full pipeline: PPTX bytes → MP4 video.

    Args:
        pptx_content: Raw bytes of the uploaded PPTX file.
        output_path: Where to write the final MP4.
        tts_engine: "polly", "edge", or "cosyvoice".
        model_id: Bedrock model ID for script generation.
        voice_id: Voice ID for the TTS engine.
        on_progress: Callback(current_slide, total_slides, stage).

    Returns:
        Path to the generated MP4 video.
    """
    work_dir = tempfile.mkdtemp(prefix="course_")

    try:
        # Step 1: Extract text and images
        if on_progress:
            on_progress(0, 0, "extracting")

        slides = extract_slides_from_pptx(pptx_content)
        image_paths = pptx_to_images(pptx_content, work_dir)

        # Attach image paths to slide objects
        for slide, img_path in zip(slides, image_paths):
            slide.image_path = img_path

        total = len(slides)

        # Step 2: Generate narration scripts
        if on_progress:
            on_progress(0, total, "generating_scripts")

        scripts = await generate_all_scripts(slides, model_id)

        # Step 3: Synthesize speech for each slide
        segment_paths = []
        for idx, (slide, script) in enumerate(zip(slides, scripts)):
            if on_progress:
                on_progress(idx + 1, total, "synthesizing")

            audio_path = os.path.join(work_dir, f"audio_{idx:03d}.mp3")

            if tts_engine == "polly":
                synthesize_speech_polly(script, audio_path, voice_id)
            elif tts_engine == "edge":
                await synthesize_speech_edge(script, audio_path)
            else:
                raise ValueError(f"Unsupported TTS engine: {tts_engine}")

            # Step 4: Compose video segment
            if on_progress:
                on_progress(idx + 1, total, "composing")

            segment_path = os.path.join(work_dir, f"segment_{idx:03d}.mp4")
            compose_slide_video(slide.image_path, audio_path, segment_path)
            segment_paths.append(segment_path)

        # Step 5: Concatenate all segments
        if on_progress:
            on_progress(total, total, "concatenating")

        concatenate_videos(segment_paths, output_path)

        return output_path

    finally:
        # Clean up temporary files
        import shutil
        shutil.rmtree(work_dir, ignore_errors=True)
用 FastAPI 做异步任务处理
在生产部署中,你不会希望在生成一段 30 分钟视频的过程中一直阻塞 HTTP 请求。下面演示如何用 FastAPI 的后台任务和一个简单的内存任务追踪器把整条流水线串起来(生产环境请替换为 Redis 或数据库):
import uuid
from fastapi import FastAPI, UploadFile, BackgroundTasks
from fastapi.responses import JSONResponse

app = FastAPI()

# In production, use Redis or a database
jobs: dict = {}


@app.post("/api/courses/generate")
async def create_video(
    file: UploadFile,
    background_tasks: BackgroundTasks,
    tts_engine: str = "polly",
):
    """Upload a PPTX and start video generation."""
    content = validate_upload(file)

    job_id = str(uuid.uuid4())
    output_path = f"/tmp/videos/{job_id}.mp4"
    os.makedirs(os.path.dirname(output_path), exist_ok=True)

    jobs[job_id] = {
        "status": "processing",
        "progress": 0,
        "total": 0,
        "stage": "queued",
        "video_url": None,
        "error": None,
    }

    def update_progress(current: int, total: int, stage: str):
        jobs[job_id].update({
            "progress": current,
            "total": total,
            "stage": stage,
        })

    async def run_pipeline():
        try:
            await generate_course_video(
                content, output_path,
                tts_engine=tts_engine,
                on_progress=update_progress,
            )
            jobs[job_id]["status"] = "completed"
            jobs[job_id]["video_url"] = f"/api/videos/{job_id}.mp4"
        except Exception as e:
            jobs[job_id]["status"] = "failed"
            jobs[job_id]["error"] = str(e)

    background_tasks.add_task(run_pipeline)

    return JSONResponse(
        status_code=202,
        content={"job_id": job_id, "status": "processing"},
    )


@app.get("/api/jobs/{job_id}")
async def get_job_status(job_id: str):
    """Check the status of a video generation job."""
    if job_id not in jobs:
        raise HTTPException(status_code=404, detail="Job not found")
    return jobs[job_id]
深入对比各 TTS 方案
选对 TTS 引擎是这套系统里最关键的决策。以下是我测试完全部五个方案后的心得。
AWS Polly
最适合: 需要可靠性和 SSML 支持的 AWS 生产部署。
Polly 的神经网络语音(英语尤其推荐 “Matthew” 和 “Joanna”)相当不错。SSML 支持很全面——你可以控制发音、停顿、重音和语速。每百万字符 4 美元的价格,对大多数场景都很划算。
主要局限是语音种类。你只能用一组固定的语音,除了 SSML 微调之外没什么可定制的。
Azure Neural TTS
最适合: 追求极致语音质量和最广泛的语言支持。
Azure 的 HD 神经网络语音可以说是目前听感最好的云端 TTS,它们的语言和地区覆盖也最广。缺点是成本——HD 语音每百万字符 16 美元,是 Polly 的四倍。
CosyVoice 2
最适合: 需要声音克隆或自定义语音风格的项目。
阿里巴巴开源的 CosyVoice 2 模型令人印象深刻。它支持零样本声音克隆(给一段 10 秒的样本,就能得到匹配的声音)、情感控制,并且能生成非常自然的语音。它可以免费使用,但推理时你需要一块至少 4 GB 显存的 GPU。
主要的代价是运维复杂度。你要在生产环境里运行一个 ML 模型,这意味着要管理 GPU 实例、处理模型加载时间,还要应对推理延迟(消费级 GPU 上通常是实时速度的 0.5 到 2 倍)。
ChatTTS
最适合: 中文内容和实验性项目。
ChatTTS 是一个社区驱动的开源模型,尤其擅长中文语音合成。它能自然地加入语气词(“嗯”、“那个”),带有一种独特的对话感。不过在英文内容上它不如 CosyVoice 打磨得精致,且不支持 SSML。
Edge-TTS
最适合: 以成本为首要考量的原型开发和个人项目。
Edge-TTS 基本上是免费的——它调用的正是微软 Edge 朗读功能所用的那套 TTS API。质量出人意料地好(底层用的就是 Azure 神经网络语音),但它并未获得官方的生产环境使用支持。速率限制没有公开文档,随时可能变化。
生产环境加固
在把它交付给真实用户之前,还有几件事需要处理。
逐张幻灯片的错误处理
不要让一张失败的幻灯片拖垮整个任务。把每张幻灯片的处理包在 try/except 里,然后继续:
async def process_slide_safe(
    slide: SlideContent,
    script: str,
    idx: int,
    work_dir: str,
    tts_engine: str,
) -> Optional[str]:
    """Process a single slide, returning None on failure."""
    try:
        audio_path = os.path.join(work_dir, f"audio_{idx:03d}.mp3")
        segment_path = os.path.join(work_dir, f"segment_{idx:03d}.mp4")

        if tts_engine == "polly":
            synthesize_speech_polly(script, audio_path)
        elif tts_engine == "edge":
            await synthesize_speech_edge(script, audio_path)

        compose_slide_video(slide.image_path, audio_path, segment_path)
        return segment_path

    except Exception as e:
        logger.error(f"Failed to process slide {idx}: {e}")
        return None  # Skip this slide in final video
大文件的内存管理
一份含 100 张幻灯片、内嵌图片的 PPTX 轻轻松松就有 500 MB。pdf2image 库会把所有页面同时加载进内存。对于大文件,请分批处理:
def pptx_to_images_batched(
    content: bytes,
    output_dir: str,
    batch_size: int = 10,
    dpi: int = 150,
) -> List[str]:
    """Convert PPTX to images in batches to limit memory usage."""
    # ... convert to PDF first ...

    from PyPDF2 import PdfReader
    reader = PdfReader(pdf_path)
    total_pages = len(reader.pages)

    image_paths = []
    for start in range(0, total_pages, batch_size):
        end = min(start + batch_size, total_pages)
        images = convert_from_path(
            pdf_path,
            dpi=dpi,
            first_page=start + 1,  # 1-indexed
            last_page=end,
        )
        for idx, image in enumerate(images):
            path = os.path.join(output_dir, f"slide_{start + idx:03d}.png")
            image.save(path, "PNG")
            image_paths.append(path)

        # Let GC reclaim memory between batches
        del images

    return image_paths
临时文件清理
始终使用 tempfile.mkdtemp() 搭配 try/finally 块,或者用 Python 的 tempfile.TemporaryDirectory 上下文管理器。原来的代码用的是手写的清理循环,一旦出错就可能留下孤儿文件。
扩展这套系统
一旦基础流水线跑通,就有几个自然而然的扩展方向:
人在环中(human-in-the-loop)的编辑。 脚本生成之后,在一个 Web 界面里把脚本呈现出来供审阅。让讲师在提交给 TTS 之前编辑、重排或重新生成单张幻灯片。
字幕生成。 FFmpeg 可以把字幕烧录进视频。根据旁白脚本生成一个 SRT 文件(时间戳由音频时长推导得出),然后叠加上去:
ffmpeg -i video.mp4 -vf "subtitles=subs.srt:force_style='FontSize=24'" output.mp4背景音乐。 用 FFmpeg 的 amix 滤镜混入低音量的背景音乐:
ffmpeg -i narration.mp3 -i bgmusic.mp3 \
  -filter_complex "[1:a]volume=0.1[bg];[0:a][bg]amix=inputs=2:duration=first" \
  mixed.mp3
章节标记。 在 MP4 中嵌入章节元数据,让观众能在兼容的播放器里在幻灯片之间跳转。
总结
构建一个 AI 视频课程生成器是个令人满足的项目,因为其中每一环都已被充分理解——PPT 解析、LLM 提示、TTS 合成、FFmpeg 合成——但要把它们组合成一条可靠的流水线,则需要在错误处理、内存管理和异步处理上多加留意。
几个关键的架构决策是:
- 独立处理每张幻灯片。 这带来了并行能力和故障隔离。
- 使用异步任务队列。 视频生成很慢;永远不要阻塞 HTTP 请求。
- 根据你的约束条件选择 TTS 引擎。 追求生产可靠性选 AWS Polly,做原型选 Edge-TTS,追求极致质量和声音克隆选 CosyVoice。
- 对输入做严格校验。 文件类型检查、大小限制,以及杜绝基于 URL 的文件拉取。
- 直接使用 FFmpeg,而不是专有的云视频服务。它更灵活、更可移植,而且免费。
整条流水线大约 10 到 15 分钟就能处理一门 50 张幻灯片的课程(耗时主要来自 TTS 合成),产出一段看起来很专业、听起来像真人旁白的视频——全程没有任何人需要站到麦克风前。
参考资料
- Amazon Nova User Guide — AWS Documentation
- edge-tts — GitHub
- FFmpeg documentation — FFmpeg